Create a roster so that Portfolio students can access assignments using Google, Clever, or a username/password combination.
This article explains how to create a roster with Portfolio students in three ways:
Sync from Google Classroom
Add students manually
Upload students using a CSV
1. Click on the Rosters & Co-Teachers tab.
2. Click the green + icon.
3. Click Import from Google.
4. Log in with your Google account.
After students are added:
5. LOCK THE ROSTER to prevent students from joining using a Basic account or creating duplicate accounts.
6. If new students are added to the Google Classroom roster later, click the sync icon (double arrows) on the roster page.
Important Notes About Google-Created Portfolio Accounts
-
If Portfolio accounts were created with Google Classroom:
Students should log in using Continue with Google
Their Classkick account will activate when they log in
Otherwise, they cannot be added to additional rosters
-
Your Classkick email must match your Google Classroom email.
See the video below on how to import your roster from Google Classroom:
2) Manually Create and Add Individual Student Accounts
1. Click on the Rosters & Co-Teachers tab.
2. Click the green + icon.
3. Click New Roster.
4. Click + Add Students.
5. Click Portfolio.
6. Click CREATE NEW PORTFOLIO STUDENTS.
7. Click Add Manually.
8. In the Student Account Information boxes, type the student's information.
Important Notes
-
If students log in with Google or Clever, they will not need to use the generated password.
The password is needed to create the account, but not to log in if using Google or Clever.
-
Students using Google or Clever should click:
Continue with Google, or
Continue with Clever
For visual support on how to create a roster manually, please watch the video below:
1. Click on the Rosters & Co-Teachers tab.
2. Click the green + icon.
3. Click New Roster.
4. Click + Add Students.
5. Click Portfolio.
6. Click CREATE NEW PORTFOLIO STUDENTS.
7. Click Import From CSV.
8. Click CHOOSE FILE.
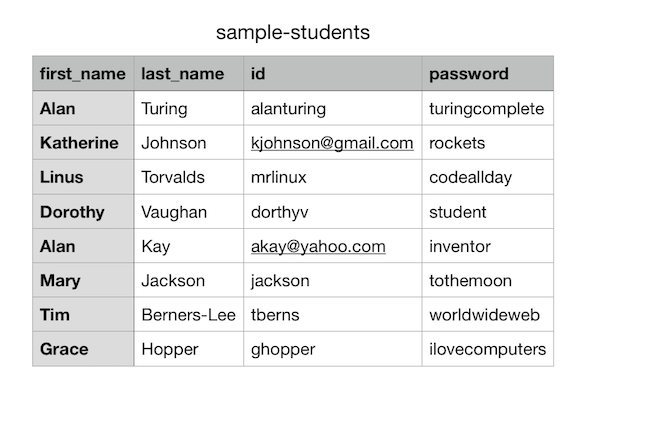
9. Click the correct CSV file from your computer > Open (see screenshot below for sample CSV format).
10. Click Continue.
11. Click ADD SELECTED.
CSV Formatting Notes
The CSV will not upload unless the column headers match exactly
The first two headers are case-sensitive (do NOT capitalize)
-
Headers must appear in this order:
first_name
last_name
id
password
If using CSV for Google or Clever login accounts:
Use the student’s Google/Clever username or email
The password column still must exist (can be generic)
Students logging in with Google or Clever do not need the password
4) Important Notes About Portfolio Students
Each Classkick user must have a unique username or email address.
If student usernames are:
student ID numbers
names
initials
the username may already exist for another student account.
To avoid duplicates, we recommend using an email address or using a combination of student ID and name/initials.
If you are part of a Classkick Pro School, check your school’s shared user list before creating new student accounts.
- For more information, please see: Add Existing Portfolio (Paid) Student Accounts to a Roster.
5) Additional Roster Resources
If you run into issues, please see the related roster help articles:
After creating your roster, make sure to LOCK THE Roster
This prevents students from logging in with multiple variations of their name and creating duplicate accounts.
See the video below for visual instructions on creating a portfolio roster: